


Thermal Scan Images

Thermal scans, also known as IR scans or Thermography is the science of measuring the temperature of objects using the Infra-red spectrum of light. This permits the generation of an image that shows the distribution of the temperature of the surface being inspected. This is useful for detection of air leaks, and to detect insulation problems in a house. This non-contact method of examining surfaces also enables checking objects such as skylights that can't be reached for air leaks without ladders or scaffolding. This methodology works best when there is at least 10C temperature difference between the inside of a building and the outside ambient air temperature. Therefore this is most effective in the fall and winter and the early spring seasons.
This equipment is normally used similar to the display in a digital movie camera, and the display provides a real time image of the subject under observation. This can be used to take still pictures, similar to a camera. This is the source of the images on this page. Normally I do not supply images of the leaks detected as part of the energy audit, due to the significant extra time that is required to supply and document the images. I can provide these as an extra cost item when required.
The following images are examples of air leaks detected during some of my energy audits. In all of the thermal scan images, the darkest colours indicate the coldest temperatures. The legend on the bottom indicates the range of temperatures that exist in the image, and the low and high temperature extreme rounded to the nearest degree. The temperature at the top left of the image is the spot temperature at the center of the cursor.
A thermal image displays the temperature of surfaces, and not of the air in the vicinity. Therefore an air leak where the cold air is traveling toward the thermal camera and not striking any surface is not apparent. It is only detected where it passes by or through an object.
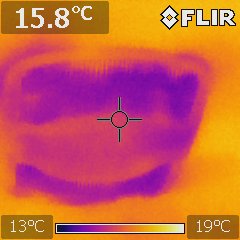
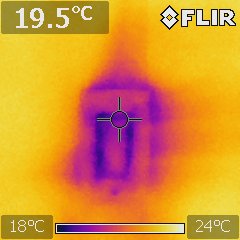
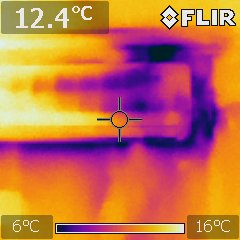
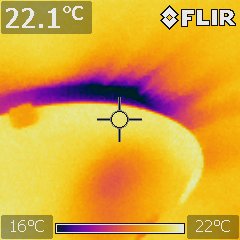 This is a ceiling light fixture in the top floor of the house. The fixture is fastened to an octagonal electrical box, which is not in this case correctly sealed to the ceiling. Cold air from the attic enters the electrical box, and then flows into the attached fixture, and eventually escapes into the room. In this image, the metal of the fixture is very cold, and there is a draft going horizontally across the ceiling as where the dark purple triangles are radiating from the base of the light fixture. The solution is to seal the electrical box to the ceiling's vapour barrier, and this requires different procedures depending on the wattage and rating of the light fixture. Only non-combustible materials should be used near a ceiling light fixture.
This should be fixed for two reasons, the most obvious is for the draft that increases the heating bill, and makes the room less comfortable. The 2nd is the same leak can let moist warm air from the house enter the attic, where it condenses in the insulation and builds up moisture and ice, decreasing the effectiveness of the insulation, which increases heating costs and ice dam problems, and mould. In a severe case moisture can drip from the fixture.
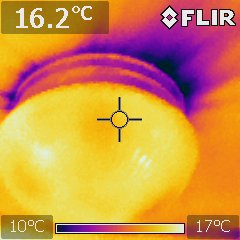
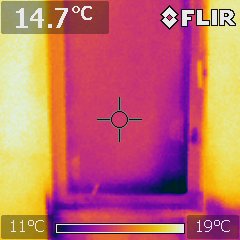
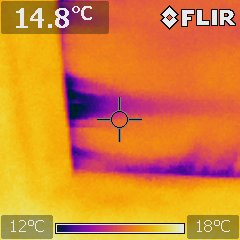 This is part of an attic hatch in a ceiling. This shows one corner of the hatch where cold air is flowing from left to right in this image, and the darker the colour, the colder the surface of the hatch. This particular image shows that the seal between the hatch and the house framing is leaking, usually when this pattern is seen, the frame that supports the hatch is not weather stripped. There is a strong flow of cold air washing over the interior surface of the hatch.
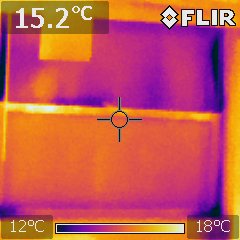
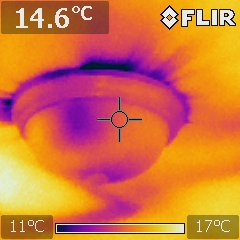
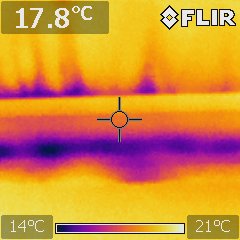 This is a different attic hatch. It has two problems, the first is similar to the previous case. This shows one side of the hatch where cold air is flowing from top to bottom in this image. This particular image shows that the seal between the hatch and the house framing is leaking. There is a strong flow of cold air washing over the interior surface of the hatch.
In addition there is air leaking from the joint between the casing (moulding) around the hatch and the drywall of the ceiling. These are seen as dark triangles pointing upwards in this view. The moulding should be more securly attached to the ceiling, and then the joint between the mounding and the drywall sealed with a clear paintable sealant.
This is a different attic hatch. It has two problems, the first is similar to the previous case. This shows one side of the hatch where cold air is flowing from top to bottom in this image. This particular image shows that the seal between the hatch and the house framing is leaking. There is a strong flow of cold air washing over the interior surface of the hatch.
In addition there is air leaking from the joint between the casing (moulding) around the hatch and the drywall of the ceiling. These are seen as dark triangles pointing upwards in this view. The moulding should be more securly attached to the ceiling, and then the joint between the mounding and the drywall sealed with a clear paintable sealant.
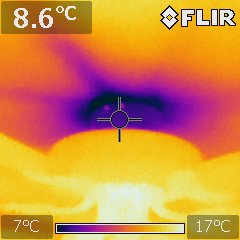
 This is a bathroom fan. Air is leaking into the house from outside, as seen by the purple areas in this image. The reason for the air flow is the one way valve that should close when the fan is off is not closing completely. This one way valve is gravity operated, and often does not close when there is a build up of lint, or other debris that impedes the smooth movement of the one way flap. Taking the fan out and cleaning behind the motor will often solve this problem. Usually the motor can be unplugged and then removed just by using a screwdriver.
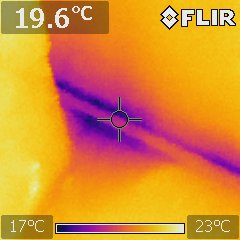
 This is a double hung sash that slides upwards when opened. In this example there are cold spots caused by air leaks in each of the four corners. In addition, the seal between the two sashes is poor, and there is a purple triangle of cold air sweeping over the upper pane of glass from the middle seal. This cold air eventually enters the room and is felt as a draft.
 This is the top right part of a window. The window is not closing completely and compressing the gasket or weather stripping, and a lot of air is leaking into the house. If this is a wooden window and it is warped, then the only practical fix is to replace the window. If the window is not warped, then the weather stripping is defective and should be replaced.
 This is a view of the top right portion of a window. The casing (moulding) is not fitting tightly to the wall. The root cause of this problem is a lack of a seal in the shim space between the window's frame and the house's rough window opening. The casing is the secondary seal for air coming in from the shim space, and in this case the casing is not a tight fit, and there is a large air flow upwards above the window, and on the right there is an example of air flowing both toward the glass and away from the glass from under the casing. The best fix for this problem is to remove the casing, seal the shim thoroughly, and then reinstall the casing. The shim space should be sealed at the outside edge of the shim space if possible, and then filled with low expansion foam. Do the foam in two passes to avoid voids in the foam. Then trim the cured foam flush with the window frame, and replace the casing. If the casing does not sit tight against the drywall, then seal this with clear, paintable sealant.
 This is a baseboard that covers the joint of drywall on the wall, and the flooring. Behind this joint, there is cold air getting past the rim joist. Then this cold air escapes into the room at the top of the baseboard where it meets the drywall, and below where it meets the floor. If a draft from this area is severe, then the baseboard should be removed, and the joint between the drywall and it's vapour barrier and the floor should be sealed, and then the baseboard replaced. This is a frequent source of leaks in older platform framed houses.
 This is a light switch mounted in an exterior wall. This is one of the type with a large plate rocker switch, rather than a traditional switch. The fixture is fastened to a rectangular electrical box, which is not perfectly sealed to the wall's vapour barrier. Cold air from the wall enters the electrical box, and then flows through the switch, and eventually escapes into the room. In this image, air is leaking from the edges of the wall decorative plate, and also between the switch and the plate. The solution is to improve the seal the wall plate, and the drywall. A kit of foam gaskets is available from hardware stores to improve the seal of these switches. The traditional switch has a smaller perimeter gap between the switch and the cover, and so the sealing kit is more effective.
 This is a ceiling light fixture in the top floor of the house. Please see the comments concerning the first image which apply to this one as well.
 This is a ceiling light fixture in the top floor of the house. Please see the comments concerning the first image which apply to this one as well.
 This is a clothes dryer vent. Air is leaking where the flange meets the wall surface. In addition, the one way flap in the outer part of the dryer vent is probably not closing fully. The solution here is to seal the flange to the drywall with a clear paintable sealant, and to clean the lint off the flap on the outside of the house.
 This is a ductless air conditioner's indoor mounted wall unit. It contains a coil and a fan. The compressor is located outside, and is connected with refrigerant pipes similar to a central air conditioner. The problem in this case was the installer created a hole from this room to the outside, but did not seal it thoroughly. In the winter cold air is leaking in here, and creating a cold draft, and causing condensation inside the indoor unit.
 This is a small dog sleeping on a couch. The whitest spots are the hottest, and the eyes and mouth are the hottest part of this pet.
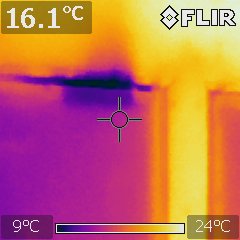
 This is a wood stove's steel chimney entering the wall to connect to a masonry chimney. There is a poor seal around the square flange, and cold air, and possibly products of combustion can enter the room from this leak.
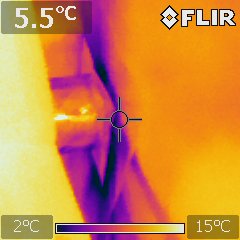
 This is the lower part of a door. The black area is very cold, and indicates there is a severe leak at the lower right part of the door.
 This is a ceiling fan fixture in the top floor of the house. The fan is fastened to an octagonal electrical box, which is not sealed to the ceiling. Cold air from the attic enters the electrical box, and then flows into the attached fixture, and eventually escapes into the room. In this image, the metal of the fixture is very cold, and there is a draft going horizontally across the ceiling as where the dark purple and black triangles are radiating from the base of the light fixture. The solution is to seal the electrical box to the ceiling, and this requires different procedures depending on the wattage and rating of the light fixture. Only non-combustible materials should be used near a ceiling light fixture. This is more difficult to seal than the typical ceiling electrical box, since it has to support the considerable weight of the fan, and withstand any vibration introduced by an imperfect balance of the fan blades. The more substantial support required means that more vapour barrier is disturbed during it's installation.